
Your Guide to Crafting the Perfect DIY Heat Pack
Sometimes, the simplest solutions are the most effective. A DIY heat pack, often just a cotton sock filled with rice, is a perfect example – a wonderfully easy and natural way to find pain relief right at home. It’s quick, you can make it exactly how you like, and it costs next to nothing compared to store-bought options for soothing those persistent aches.
Why Making Your Own Heat Pack is a Game Changer for Natural Relief

Before we get into the nuts and bolts of making one, let’s talk about why a homemade heat pack is such a fantastic choice. In a world full of complicated gadgets, there’s something genuinely satisfying about crafting your own remedy from natural, everyday things you already have in the cupboard.
This isn't just about saving a few dollars; it's about reclaiming a bit of control over your own wellbeing. You get to create a tool that is perfectly suited to your body and your specific needs.
The Power of a Personalised Fit
A generic, off-the-shelf heating pad is designed for everyone, which means it’s often perfect for no one. When you make your own, you’re in complete control. Every detail can be adjusted to give you the most effective relief possible.
- Custom Shape and Size: You can sew a long, thin pack that drapes perfectly over your neck and shoulders to ease a tension headache, or a small, round one that sits comfortably on your temple. The design is entirely up to you.
- The Right Weight and Pressure: By simply adding more or less filling, you can make a lightweight pack for sensitive spots like your forehead or a heavier one for that deep, comforting pressure on aching muscles.
- Aromatherapy Your Way: This is where it gets really good. Mix in some dried lavender for calm, or a few drops of peppermint essential oil to help with headache relief. You get the dual benefits of moist heat and soothing scents.
The move towards these kinds of at-home wellness tools is definitely growing. In fact, the Australian heating pad market, which includes these homemade alternatives, is expected to grow quite a bit, showing just how much people value having personalised comfort on hand.
Key Takeaway: A DIY heat pack is so much more than a craft project—it's your own personalised therapy tool. Being able to customise its size, weight, and even its scent elevates it from a simple warmer to a targeted solution for your specific pain.
When you understand the basics of how heat therapy helps to soothe pain, you can create a remedy that’s far more effective. Making your own pack means you can apply that science in a way that truly works for you.
Picking the Right Materials for Your Custom Heat Pack
The magic of a truly great DIY heat pack isn't just in the making—it's in the materials you choose from the get-go. What you use for the outer shell and the filling inside makes all the difference in how it feels and how long that soothing warmth lasts. Getting this part right means your finished heat pack will be comfortable, effective, and, most importantly, safe to use.
Choosing Your Fabric
When it comes to the fabric, think natural fibres. Your best bet is 100% cotton fabrics like a soft flannel, basic quilting cotton, or even a thin corduroy. Why cotton? Because synthetic materials like polyester or nylon can't handle the heat; they can melt in the microwave or release fumes you don't want anywhere near your face.
I'm a big fan of using flannel. It's incredibly soft against the skin, and its slightly thicker weave acts as a natural insulator, helping the heat spread out evenly instead of creating uncomfortable hot spots. Before you start sewing, give the fabric a quick once-over to make sure there are no sneaky metallic threads woven in. Anything metallic is a huge no-go for the microwave, as it can spark and become a fire hazard.
Finding the Perfect Filling
The filling is the soul of your heat pack. It dictates how heavy it is, what it feels like against your skin, and how well it holds onto that precious heat. There’s no single "best" option—it really boils down to what you prefer and what you might already have kicking around in the kitchen.
- Uncooked Rice: This is the old faithful of heat pack fillings. It's cheap, easy to find, and does a fantastic job of holding onto a gentle, consistent warmth.
- Flaxseed (or Linseed): These tiny, oil-rich seeds are my personal favourite. They release a subtle moist heat that feels like it sinks deeper into your muscles. Plus, their small size means the pack drapes beautifully over your forehead or neck.
- Cherry Pits: If you're after something with a bit more substance, cherry pits are a brilliant choice. They offer a firmer, almost massage-like pressure and have the added bonus of being washable.
The type of filling you choose really changes the whole experience. That moist heat from flaxseed, for example, can be a game-changer for sinus pressure headaches. On the other hand, the solid feel of cherry pits might be just what you need to work out a knot in your neck.
Keep in mind that each filling has a different staying power. Rice will give you a solid 15-20 minutes of warmth, but the natural oils in flaxseed often help it stay warmer for just a little bit longer, giving you a few extra minutes of relief.
Comparing Common DIY Heat Pack Fillings
To make the choice a bit easier, here’s a quick-glance comparison of the most popular natural fillings. Think about the kind of comfort you're craving. Is it a gentle, dry warmth? A deeper, moist heat? Or a firmer, massaging pressure?
| Filling Type | Heat Retention | Moisture Level | Texture & Feel |
|---|---|---|---|
| Uncooked Rice | Good | Low (Dry Heat) | Smooth, classic feel |
| Flaxseed | Excellent | Medium (Moist Heat) | Silky, conforms well |
| Cherry Pits | Very Good | Low (Dry Heat) | Firm, massage-like |
Ultimately, there’s no wrong answer here. Building your own heat pack is all about customising it to what works for you. A soft flannel bag filled with flaxseed might become your go-to for headaches, while a simple cotton and rice pack could be perfect for everyday aches. Don't be afraid to experiment—that's half the fun of creating a home remedy that's perfectly suited to you.
Crafting Your Heat Pack Without a Sewing Machine
Alright, let's get to the fun part—actually making your own heat pack. You really don't need to be a pro with a sewing machine to create something that’s both effective and will last. We’ll walk through two incredibly simple methods, both designed to produce a shape that's perfect for tackling headache pain.
The goal here is a long, slender pouch. Why? Because this shape is versatile. You can drape it perfectly over your forehead, wrap it across your temples, or let it rest on the tense muscles at the base of your neck. It’s all about getting that gentle heat and pressure right where you need it.
The Simple Sock Method
Honestly, the quickest way to get relief is with a clean, long sock. This is my go-to no-sew method when a headache pops up unexpectedly and I don't want any fuss. An old cotton athletic sock is absolutely perfect for this.
Here’s how you do it:
- Grab a sock: Find a clean, sturdy sock made from 100% cotton. Steer clear of anything synthetic or with those shimmery metallic threads, as they’re a big no-no for the microwave. The longer the sock, the better the coverage.
- Fill it up: A funnel makes this part easy, but a rolled-up piece of paper works just as well. Pour in your chosen filling—rice, flaxseed, whatever you've picked. Only fill it about two-thirds of the way. You need that extra space for the filling to move around and mould to your head and neck.
- Tie it off: Secure the open end with a really, really tight knot. I usually double-knot it just to be safe. You could even fold the cuff over before knotting for an extra layer of security. The last thing you want is rice all through your bed!
This whole process takes less than five minutes. It's a brilliant starting point and gives you an instant tool to fight off a tension headache. Plus, the natural stretch of a sock helps it conform beautifully to the contours of your body.
Pro Tip: If you're using a fine filling like flaxseed, here's a trick I've learned. Put the flaxseed into a smaller, tied-off pouch (or even a second, smaller sock) first, and then place that inside your main sock. This double-layering technique pretty much guarantees no leaks.
The infographic below gives you a quick visual rundown of picking the right materials for your heat pack, from the fabric right through to the filling.

As you can see, it really just boils down to a few key choices to get from a pile of supplies to a soothing, finished heat pack.
Hand-Sewing a Custom Pouch
If you want something a bit more durable or a specific shape, hand-sewing a simple pouch is the way to go. This approach lets you create the exact dimensions you want—for instance, a long, thin pack designed specifically to lay across your eyes and forehead during a migraine.
First, cut two identical rectangles from a piece of 100% cotton fabric. From experience, a great size for headache relief is around 50 cm long and 12 cm wide. This gives you a really versatile shape that’s easy to position.
Next, place the two pieces of fabric together, with the "right" sides (the patterned or nicer sides) facing each other. Using a needle and some strong cotton thread, sew a basic running stitch along three of the sides. Make sure to leave a small seam allowance, about 6-8 mm, from the edge. I always recommend double-stitching the seams; it adds strength and stops any stray grains from poking their way out later on.
Once three sides are stitched up, turn the pouch right-side out. Now it's ready for filling. Just like the sock method, fill it about two-thirds full to keep it nice and floppy. For the final step, carefully tuck the raw edges of the open end inward and stitch it closed. A secure whipstitch or a ladder stitch works perfectly here, creating a neat, sealed edge. And there you have it—your own custom-made heat pack, ready for action.
A Critical Guide to Safe Heating and Usage
You’ve made the perfect DIY heat pack, and now comes the most important part: using it safely. It’s easy to think of these as simple, harmless comfort items, but without the right precautions, they can be genuinely hazardous. Getting this next step right means you get all the soothing relief with none of the risks.
The main dangers aren't trivial. We're talking about nasty skin burns from an overheated pack or, even worse, a fire. The organic fillings we use—rice, flaxseed, cherry pits—can absolutely scorch and ignite if you blast them with too much heat. This isn't just a theoretical warning; it’s a real-world risk that demands your full attention every single time.
Microwave Heating Done Right
The microwave is usually the quickest way to warm your pack, but it requires a bit more thought than just hitting the start button. The goal is to achieve a gentle, even warmth, not a scorching hot spot.
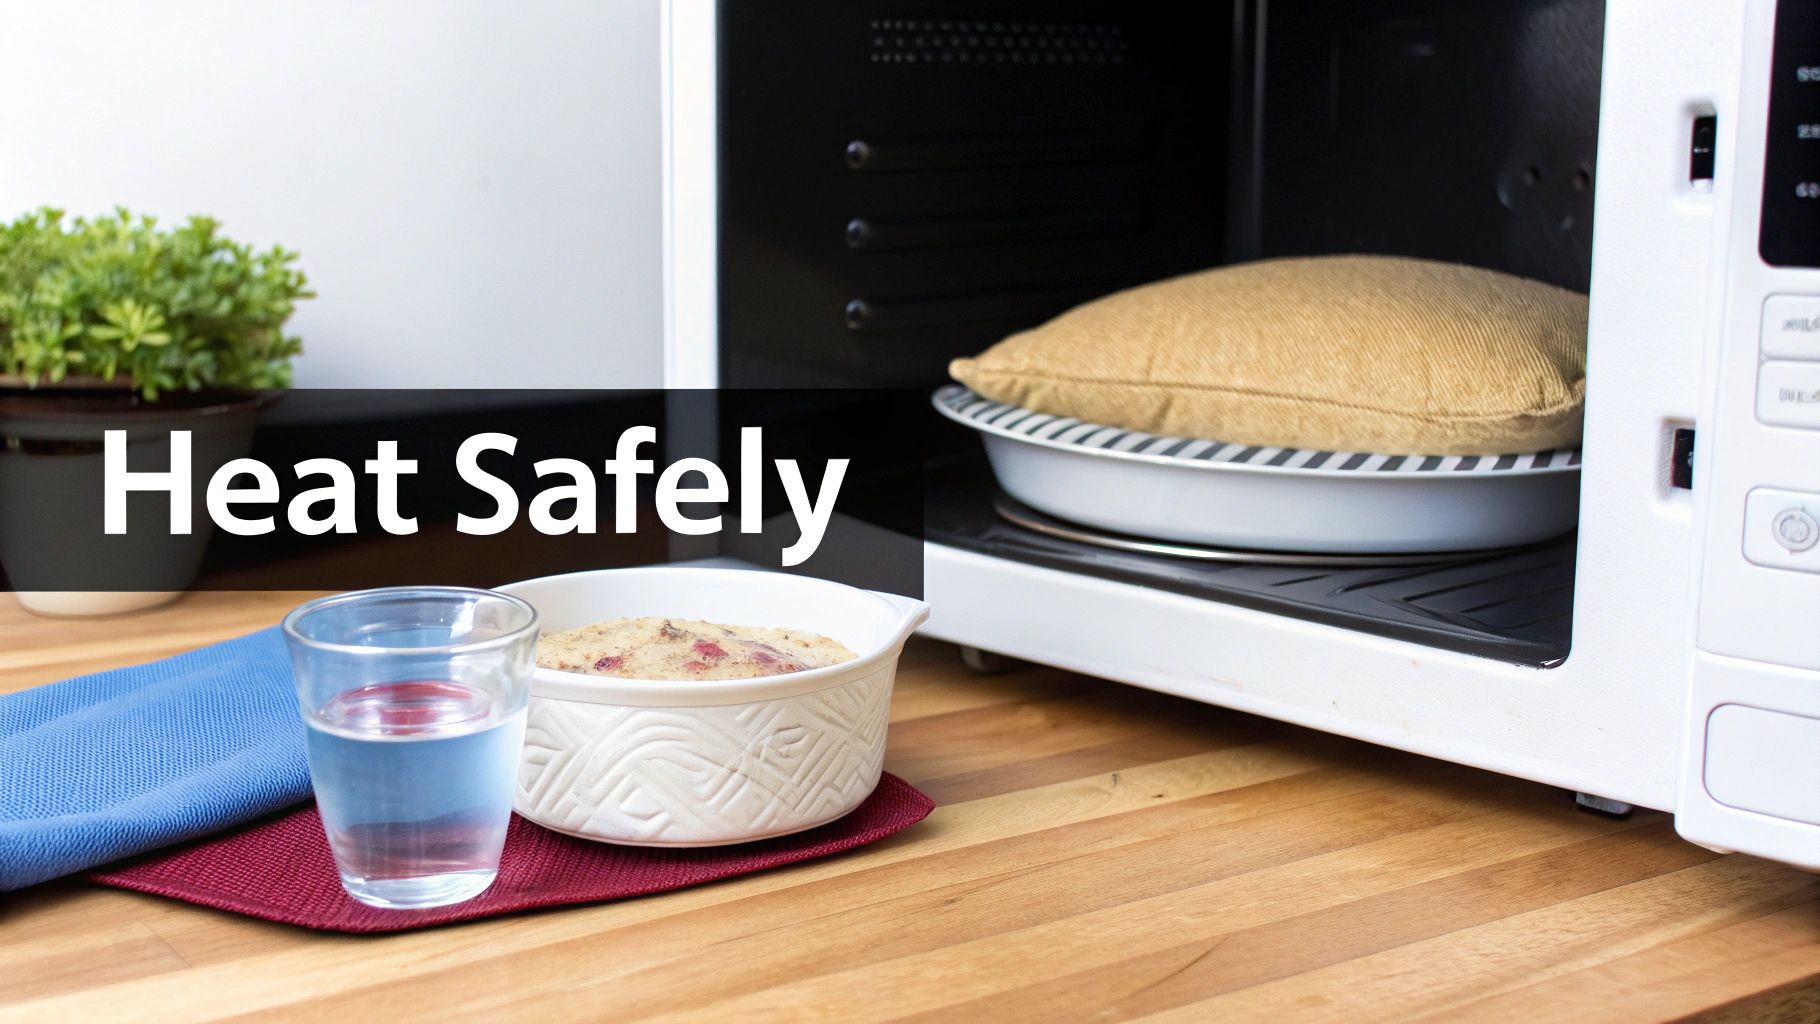
First up, make sure your microwave is clean. Leftover food scraps or grease can get incredibly hot and create dangerously superheated patches on your pack’s fabric. If you have a turntable, double-check that your pack can spin freely without catching on the sides—that rotation is key to even heating.
Here’s the single most important tip I can give you: always place a small, microwave-safe cup of water in there with your heat pack. This is non-negotiable. It adds moisture to the microwave, which stops the dry grains inside your pack from scorching or, in a worst-case scenario, catching fire. It’s a simple safety buffer that protects both you and your pack.
When it comes to timing, the only rule you need to remember is "start low and go slow."
- Heat your pack in 30-second bursts. No longer.
- After each interval, carefully take it out, give it a little shake to move the filling around, and test the temperature on a sensitive area, like your inner wrist.
- Most packs will be perfectly warm within 60 to 90 seconds total. Don’t be tempted to go beyond two minutes of total heating time.
Understanding the Dangers of Overheating
The potential for things to go wrong is very real. Australia's Therapeutic Goods Administration (TGA) has documented numerous serious incidents, from severe burns to house fires, all caused by microwavable heat packs being used incorrectly. It became such a concern that fire authorities and the TGA collaborated on an official Australian-New Zealand Standard (AS/NZS 5116:2016) just for these products.
Never, ever fall asleep with a heated pack. Don't use one on infants, the elderly, or anyone with nerve damage who might not realise it’s too hot. The heat can cause deep tissue burns before the person is even aware of the danger.
Alternative Heating With an Oven
No microwave? No problem. You can use your oven, but it requires a different approach.
Preheat your oven to a very low temperature—around 80°C (175°F) is ideal.
Place your heat pack on a clean baking tray and pop it in for about 15 minutes. You’ll need to keep a close eye on it, checking frequently to make sure it’s warming gently and not getting too hot. This method gives a lovely, radiant heat, but it definitely isn't a "set and forget" option.
Whether you're using a homemade solution or a professionally designed product, knowing how to apply it correctly makes all the difference. For more insights on getting the most out of therapeutic caps, take a look at our guide on how to use a headache relief cap. Your safety always comes first, so please be careful and enjoy the soothing relief.
Cold Therapy and Long-Term Care for Your Pack
Your DIY pack’s usefulness doesn’t stop at soothing warmth. One of its best features is that it can pull double duty, easily transforming into a cold pack for a different kind of relief. This versatility is a huge reason why so many of us are turning to these simple, effective solutions at home.
The growing market for home heating and cooling items, including these homemade packs, really shows how much we value adaptable comfort. With power bills always on our minds and a general shift towards greener options, Aussies are increasingly looking for reusable, cost-effective remedies. It's a trend reflected in the AU$1.44 billion market, driven by our diverse weather and need for practical solutions. You can see more on this in recent heating and cooling industry insights.
Flipping Your Heat Pack Into a Cold Compress
Sometimes, when a migraine hits with that awful pulsating pain, cold is what you really need. Cold therapy works by constricting blood vessels and numbing the area, which can be a game-changer for dulling the sharp, throbbing pain of certain headaches. Our guide on what cold therapy is and how it helps dives deeper into the science if you're curious.
Making the switch from hot to cold couldn't be easier.
- Seal it up first. Pop your DIY pack into a zip-top plastic bag or an airtight container. This is a non-negotiable step; it stops the pack from getting damp or absorbing that weird "freezer smell".
- Give it time to chill. Lay it flat in the freezer for at least two to three hours. This gets the filling properly cold so it can deliver long-lasting relief.
- Apply and relax. Once it's chilled, the pack will be firm but still pliable, ready to mould perfectly to your forehead, temples, or the back of your neck.
Keeping Your DIY Pack in Good Nick
A little bit of care will keep your homemade remedy clean, effective, and safe for years to come. Since you can't just toss it in the washing machine, proper maintenance is key.
Key Takeaway: Whatever you do, never submerge your DIY heat pack in water. The filling will soak it up, swell, and almost certainly grow mould, making it completely unusable. Spot-cleaning is the only way to go.
To keep it fresh, just use a damp cloth with a dab of mild soap to gently clean any spots on the fabric. Make sure you let it air dry completely before heating or storing it away.
Over time, after countless trips to the microwave, the natural moisture inside the filling can dry out. This makes the pack less effective and can even increase the risk of scorching. To fix this, you can ‘recharge’ it. Just place it in the microwave next to a cup of water and let it sit in the steamy environment for about 10 minutes (don't turn the microwave on!). This helps the filling rehydrate.
Finally, know when to say goodbye. If you ever notice a persistent burnt smell, see scorch marks on the fabric, or find the filling just isn't holding heat like it used to, it’s time to retire it. Making a new DIY heat pack is quick and easy, ensuring you always have a safe and reliable tool ready for when pain strikes.
Got Questions About Your DIY Heat Pack? Let's Get Them Sorted
Making your own heat pack is pretty simple, but a few questions always seem to pop up, especially when you're just starting out. Getting the little details right is what makes the difference between a so-so heat pack and one that becomes your go-to for comfort. Let's dig into some of the most common ones I hear.
One of the best parts of a DIY heat pack is that you can easily add a bit of aromatherapy. A few drops of essential oil or a sprinkle of dried herbs mixed in with the rice or flaxseed can turn a basic warmer into a truly relaxing experience.
- For pure relaxation: You can't go wrong with dried lavender. It's a classic for a reason—it just helps melt the stress away. A few drops of lavender essential oil works just as well.
- For headache relief: I find peppermint or eucalyptus oils are fantastic, especially if you're dealing with sinus pressure alongside the headache. The scent feels so clearing.
- For a little lift: If you want something more energising, a citrus oil like sweet orange or lemon can be a really cheerful choice.
Just be gentle with the essential oils. Add only 2-3 drops to your entire batch of filling and give it a really good stir before you sew the pack shut. The warmth will release the scent beautifully without it being overpowering.
Why Does My Heat Pack Cool Down So Fast?
This is a common frustration! If your heat pack is losing its warmth quicker than you'd like, it usually boils down to one of two culprits: the type of filling you've used or how much you've put in. Different fillings hold heat differently. For instance, flaxseed has a higher oil content, which helps it retain a lovely, moist heat for longer than plain white rice.
The other likely reason is that it's simply underfilled. A half-empty pack has too much air and not enough substance to actually hold the heat. It’ll cool down in a flash. You're aiming to fill it about two-thirds to three-quarters full. This gives it enough heft to retain warmth while still being pliable enough to drape comfortably over your forehead or neck.
A well-made flaxseed pack, filled correctly, should give you a solid 20-25 minutes of soothing warmth. That’s generally the perfect amount of time for a single heat therapy session.
Can I Throw My Heat Pack in the Wash?
This is a big one, and the answer is a definite no. Never, ever submerge a grain-filled heat pack in water. The filling will soak up the moisture, swell up, and you'll have a mouldy, unusable mess on your hands before you know it.
The only safe way to clean it is to spot-clean the fabric. Grab a damp cloth with a tiny bit of mild soap and gently dab at any marks on the surface. Make sure it's completely air-dried before you even think about heating it up again. A much better long-term solution is to make a simple, removable outer cover that you can toss in the wash whenever you need to.
If managing a DIY pack sounds like a bit too much fuss, or if you're after a more heavy-duty and convenient solution for frequent headaches, a professionally designed Headache Cap is a great alternative. It provides reliable hot or cold therapy without any of the guesswork. You can check out the full range at https://headachecap.com.au.


